-
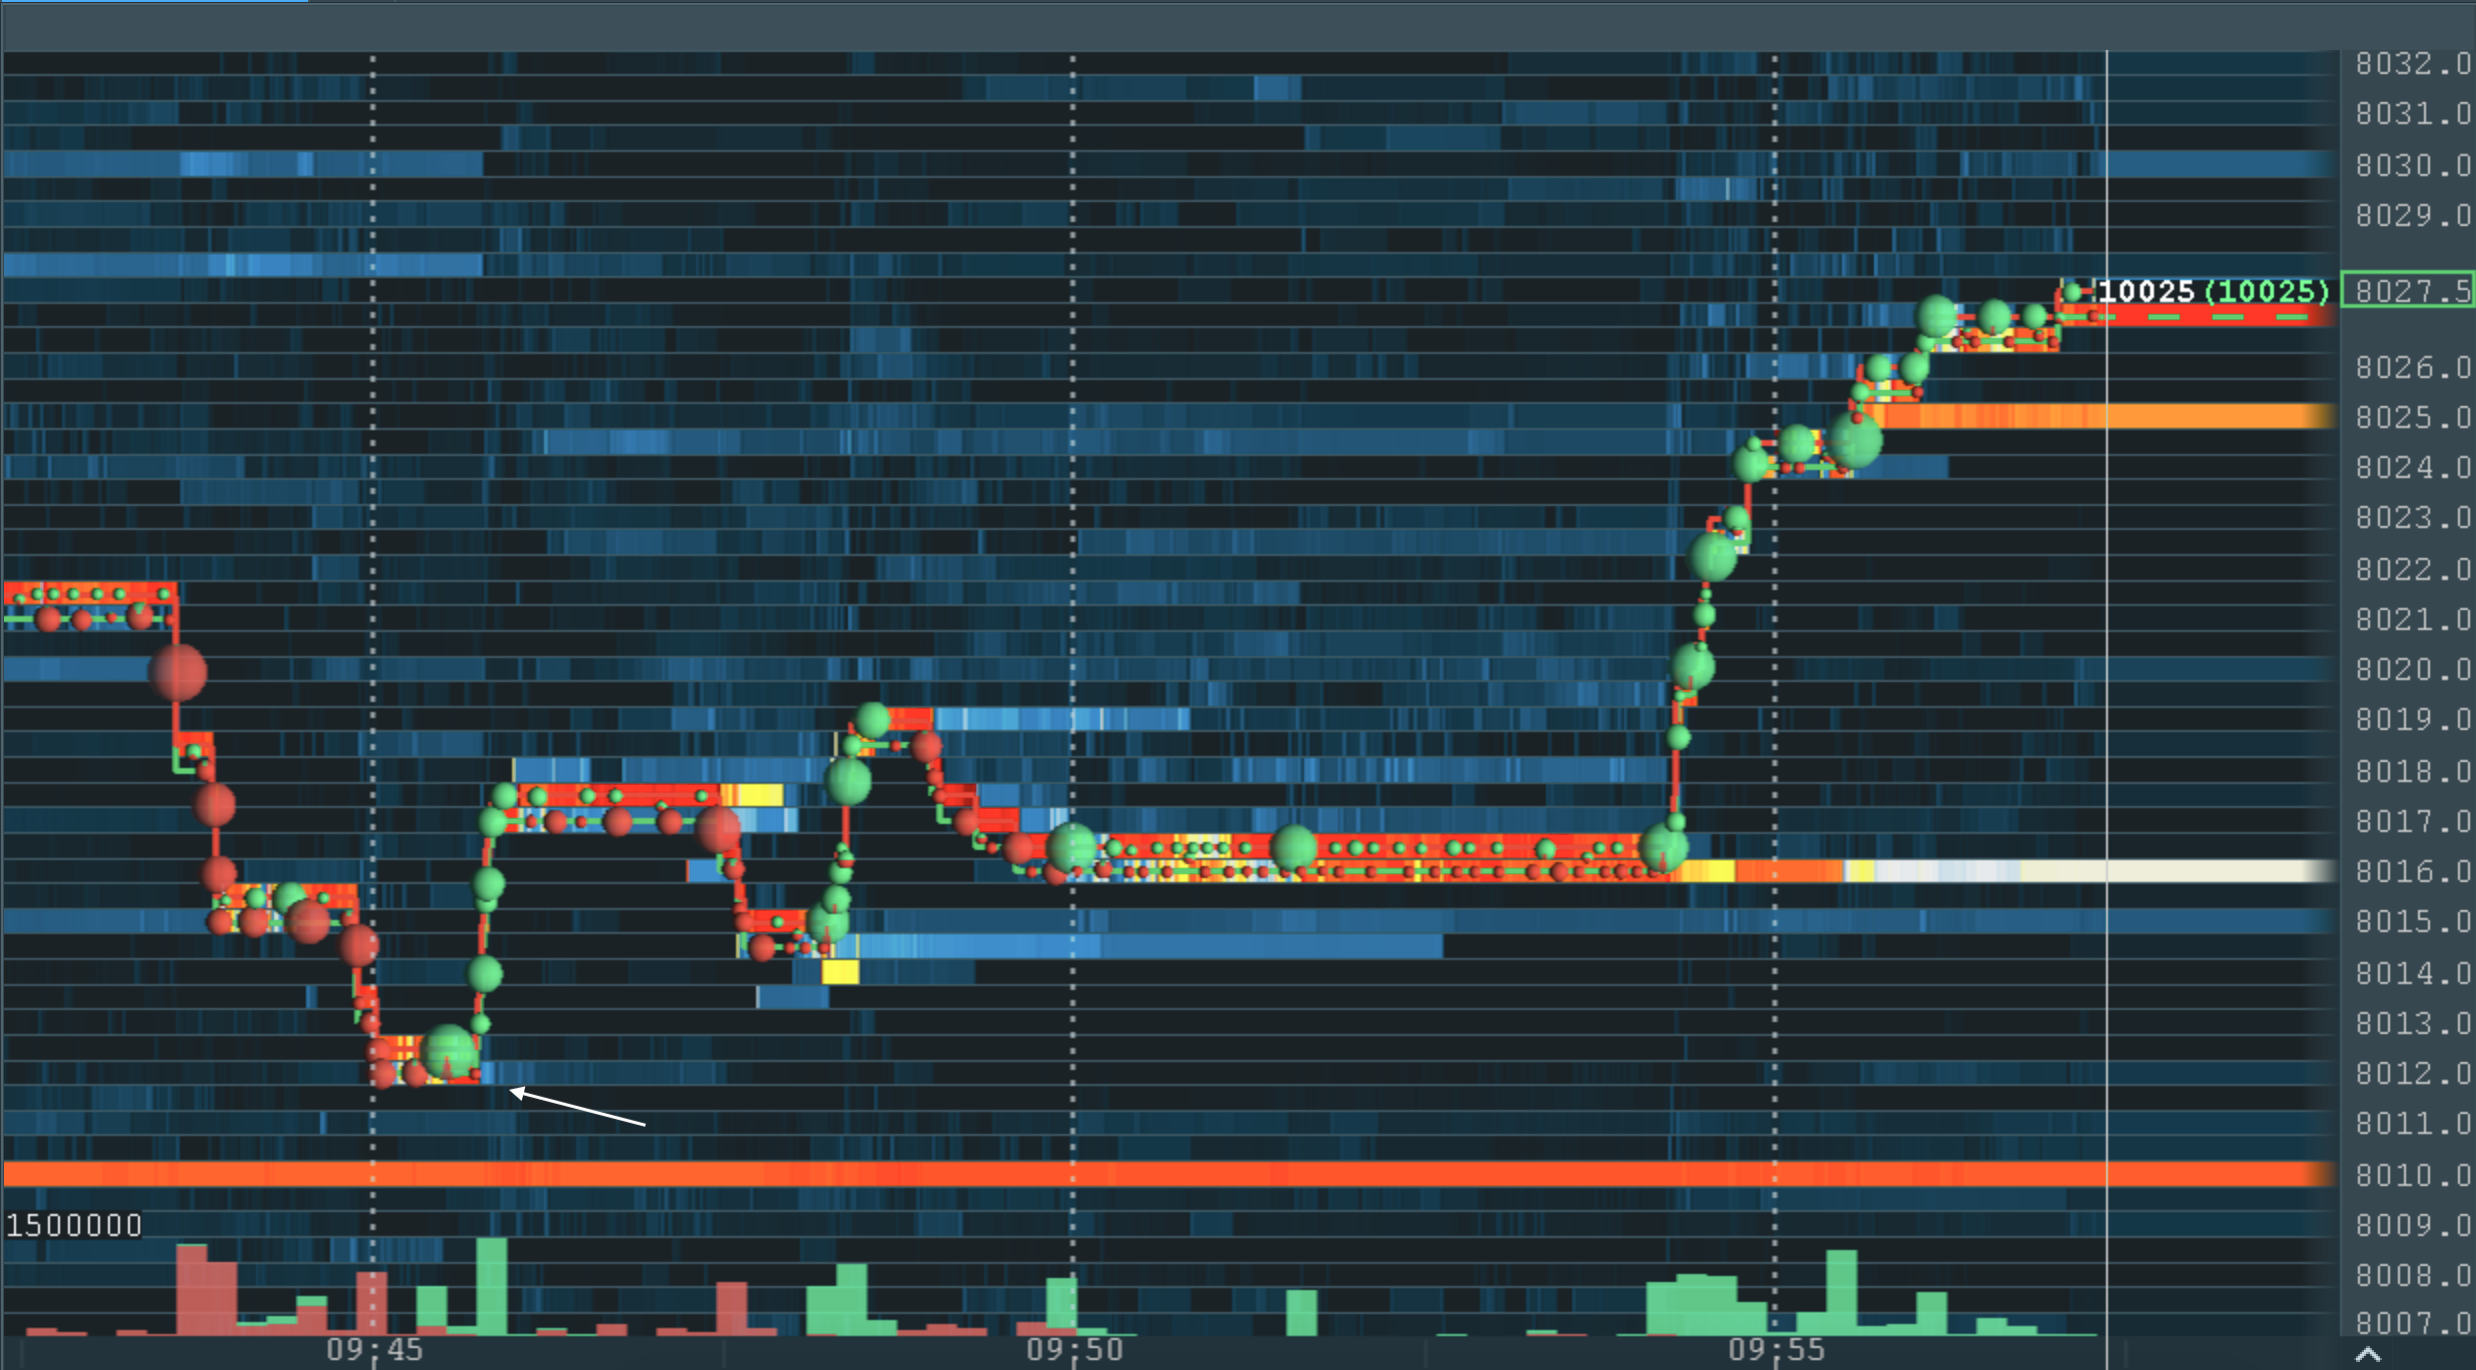
1.Trading Scenarios
-
1.Scenario 1 – Aggressive Best Bid
-
2.Scenario 2 – Aggressive Best Offer
-
3.Scenario 3 – Respected Large Bid
-
4.Scenario 4 – Respected Large Offer
-
5.Scenario 5 – Filled Large Bid
-
6.Scenario 6 – Filled Large Offer
-
6.Scenario 6 – Filled Large Offer
-
8.Scenario 8 – Supply Run
-
9.Order Flow_ Supply and Demand Runs
00:00
-
10.Scenario 9 – Dominant Market Buying
-
11.Scenario 10 – Dominant Market Selling
-
12.Scenario 11 – Large Market Buy
-
13.Scenario 12 – Large Market Sell
-
14.Scenario 13 – Weak Resistance
-
15.Scenario 14 – Weak Support
-
16.Scenario 15 – Strong Resistance
-
17.Scenario 16 – Strong Support
-
18.Order Flow Support and Resistance
00:00
-
19.Scenario 17 – Distant Bidding Activity
-
20.Scenario 18 – Distant Offering Activity
-
21.Scenario 19 – Bid Cluster Shift Up
-
22.Scenario 20 – Bid Cluster Shift Down
-
23.Scenario 21 – Offer Cluster Shift Down
-
24.Scenario 22 – Offer Cluster Shift Up
-
25.Scenario 23 – Reduction in Bidding
-
26.Scenario 24 – Reduction in Offering
-
27.Scenario 25 – Failed Demand Injection
-
28.Scenario 26 – Failed Supply Injection
-
29.Scenario 27 – Empty Bids
-
30.Scenario 28 – Empty Offers
-
31.Scenario 29 – Bid Shadows
-
32.Scenario 30 – Offer Shadows
-
33.Scenario 31 – Iceberg Bids
-
34.Scenario 32 – Iceberg Offer
-
35.Scenario 33 – Bid Spoofing
-
36.Scenario 34 – Offer Spoofing
-
37.Scenario 35 – Momentum Ignition on the Bid
-
38.Scenario 36 – Momentum Ignition on the Offer
-
39.Scenario 37 – Bid Sweeping
-
40.Scenario 38 – Offer Sweeping
-
41.Scenario 39 – Spoofing to Execute Bids
-
42.Scenario 40 – Spoofing to Execute Offers
-
43.Scenario 41 – Best Bid Reversal
-
44.Scenario 42 – Best Offer Reversal
-
45.Scenario 43 – Holding Bid
-
46.Scenario 44 – Holding Offer
-
47.Scenario 45 – Prolonged Equilibrium
-
48.Scenario 46 – Time and Volatility
-
49.Scenario 47 – Big Picture Analysis
-
50.Order Flow_ Macro
00:00
-
51.Trading Scenario 48 – Trapped Buyers
-
52.Trading Scenario 49 – Trapped Sellers
-
53.Trading Scenario 50 – Bullish Deflection
-
54.Trading Scenario 51 – Bearish Deflection
-
55.Trading Scenario 52 – Trading Bullish Momentum
-
56.Trading Scenario 53 – Trading Bearish Momentum
-
57.Trading Scenario 54 – Support becomes Resistance
-
58.Trading Scenario 55 – Resistance becomes Support
-
59.Trading Scenario 56 – Filled Bid as Support
-
60.Trading Scenario 57 – Filled Offer as Resistance
-
61.Trading Scenario 58 – VP Market Pressure
-
62.Trading Scenario 59 – Buying after Strong Demand Run
-
63.Trading Scenario 60 – Selling after Strong Supply Run
-
64.Action and Reaction
00:00
-
2.Practice Scenarios
-
1.Practice Scenario 1-1. Fresh Demand vs Old Demand
-
2.Practice Scenario 1-1. Fresh Demand vs Old Demand (Answer)
-
3.Practice Scenario 1-2. Fresh Demand vs Old Demand
-
4.Practice Scenario 1-2. Fresh Demand vs Old Demand (Answer)
-
5.Practice Scenario 2-1. Fresh Supply vs Old Supply
-
6.Practice Scenario 2-1. Fresh Supply vs Old Supply (Answer)
-
7.Practice Scenario 2-2. Fresh Supply vs Old Supply
-
8.Practice Scenario 2-2. Fresh Supply vs Old Supply (Answer)
-
9.Practice Scenario 3-1. IncreaseDecrease in DemandSupply
-
10.Practice Scenario 3-1. IncreaseDecrease in DemandSupply (Answer)
-
11.Practice Scenario 3-2. IncreaseDecrease in DemandSupply
-
12.Practice Scenario 3-2. IncreaseDecrease in DemandSupply (Answer)
-
15.Practice Scenario 4-1. Identifying the Spoofer’s Direction
-
16.Practice Scenario 4-1. Identifying the Spoofer’s Direction (Answer)
-
17.Practice Scenario 4-2. Identifying the Spoofer’s Direction
-
18.Practice Scenario 4-2. Identifying the Spoofer’s Direction (Answer)
-
19.Practice Scenario 4-3. Identifying the Spoofer’s Direction
-
20.Practice Scenario 4-3. Identifying the Spoofer’s Direction (Answer)
-
21.Practice Scenario 5-1. Identifying the Volume Pressure
-
22.Practice Scenario 5-1. Identifying the Volume Pressure (Answer)
-
23.Practice Scenario 5-2. Identifying the Volume Pressure
-
24.Practice Scenario 5-2. Identifying the Volume Pressure (Answer)
-
25.Practice Scenario 6-1. Identifying Trapped Traders
-
26.Practice Scenario 6-1. Identifying Trapped Traders (Answer)
-
27.Practice Scenario 6-2. Identifying Trapped Traders
-
28.Practice Scenario 6-2. Identifying Trapped Traders (Answer)
-
29.Practice Scenario 7-1. Trading Deflections
-
30.Practice Scenario 7-1. Trading Deflections (Answer)
-
31.Practice Scenario 7-2. Trading Deflections
-
32.Practice Scenario 7-2. Trading Deflections (Answer)
-
33.Practice Scenario 8-1. Momentum Ignition
-
34.Practice Scenario 8-1 Momentum Ignition (Answer)
-
35.Practice Scenario 8-2. Momentum Ignition
-
35.Practice Scenario 8-2. Momentum Ignition
-
36.Practice Scenario 8-2. Momentum Ignition (Answer)
-
37.Practice Scenario 9-1. Layering in Executions
-
38.Practice Scenario 9-1. Layering in Executions (Answer)
-
39.Practice Scenario 9-2. Layering in Executions
-
40.Practice Scenario 9-2. Layering in Executions (Answer)
-
41.Practice Scenario 10-1. An Order Flow Analysis
-
42.Practice Scenario 10-1. An Order Flow Analysis (Answer)
-
43.Practice Scenario 10-2. An Order Flow Analysis
-
44.Practice Scenario 10-2. An Order Flow Analysis (Answer)
-
45.Practice Scenario 10-3. An Order Flow Analysis
-
46.Practice Scenario 10-3. An Order Flow Analysis (Answer)
-
47.Practice Scenario 10-4. An Order Flow Analysis
-
48.Practice Scenario 10-4. An Order Flow Analysis (Answer)
-
3.Studying
-
Studying
-
4.Checklist
-
1.Order Flow Checklist
-
2.Live Trading Checklist